• Home
  • Food for Thot
    • All Recipes
    • Breaky
    • Soups + Spoons
    • Snacks + Sides
  • Food Appropriation
    • Family Secrets
    • Fire Island
    • Mexican Night
    • Pizza Night
  • Get Baked
  • Sips
  • Eat Out
  • Cookbook Club
  • Cucina's Closet
  • Blog
  • About + Contact
  • Menu

The Queer Cucina

  • Home
  • Food for Thot
    • All Recipes
    • Breaky
    • Soups + Spoons
    • Snacks + Sides
  • Food Appropriation
    • Family Secrets
    • Fire Island
    • Mexican Night
    • Pizza Night
  • Get Baked
  • Sips
  • Eat Out
  • Cookbook Club
  • Cucina's Closet
  • Blog
  • About + Contact

MOM'S GNOCCHI

December 31, 2017 in Food for Thot, Meals, Family Secrets

Imagine having a few too many drinks at your uncle’s 50th birthday party and then your mother invites you over the next day to learn how to make gnocchi. I woke up and don’t remember the night, but I do remember the promise of fresh pasta. 

I wanted to share the experience I had while watching my mother take just flour and ricotta and turn them into something that sauce perfectly adhered to and melted in your mouth, all while not leaving you stuffed.


Ingredients:

  • 2 lbs of Ricotta (we used Poly-O original)

  • 6-8 cups of All-purpose flour

Tools: (optional)  certainly makes it easier

  • Bench Scrapper  knife can be used

  • Gnocchi Board  fork will work just fine

Makes approx 2 lbs (extra to freeze)

Make sure you have a clean stable work surface. My mom has a special board she had made for pasta and struffoli’s (honey balls). This is not required, but makes for an easy, low hassle working surface. Scoop out the ricotta into a pile and make a well in the center by taking a spoon and going in a circular motion.

Then you just need to add the flour in increments, mixing with your hands, until the right consistency in formed. Very similar to other pasta dough’s, it can’t be too sticky. If it continues to stick to your fingers, keep adding flour. The reason you add the flour in increments, is that you don’t want it to become too dry.

aacb1a_6f43e38c78194c3a888e381b507478b9~mv2.jpg


You’ll notice the dough is sticky, but not forming together. Keep adding flour and kneading it with your hands.


The dough is finally starting to come together and resemble a log. With an un-floured finger, try poking the dough and it you don’t stick, then the dough will be ready for rolling out.

Now comes the fun part. Place the dough in the corner of your workspace, since you are going to need plenty of room for rolling out and cutting. Cover the dough with a clean towel and using your bench scrapper or a knife, cut a 2 inch piece off at a time. Roll this into a 1/2″ thick log, you can make them as big or small as you would like.

Next, using the bench scrapper or a knife, cut them into 3/4″

You can cook them if you wanted to now, but traditional gnocchi have ridges. To create the ridges, press each piece of dough against the front of a fork then gently roll up and around the back of the fork. If you the dough is sticking to the fork, dust the fork lightly with flour. If you happen to have a wooden gnocchi board, then you just press the dough at the top and roll it down.

After each rope is cut and formed into gnocchi, using your bench scrapper or a spatula, place them onto a lightly floured baking sheet, lined with parchment paper. This makes it easier to transport them to the water, once you’re ready to cook them.

aacb1a_f19f12d28c8843b085d2b62c93921978~mv2.jpg

Bring a large pot of salted water to boil and gently add the gnocchi, they will cook very fast. Approx 5-6 minutes and they will start floating to the top. Make sure you have an official pasta tester who has agreed to judge the doneness. That would be my dad. He’s the most picky eater and he loves his pasta, so were not done until he says so.

Once Big John says the pasta is done, then drain them and toss with your favorite sauce. We’ve got mom’s homemade sauce of course.

Enjoy. Not only is the pasta delicious, its fun to make and brings everyone together. That has to be the most rewarding thing about food.

Thank you Mom.

Love,

your Son

Print Friendly and PDF
aacb1a_93baa2049d78494db564c8b2da83c9b9~mv2.jpg

QUICK DILL PICKLES

December 31, 2017 in Snacks + Sides, Fire Island, Food for Thot

Recipe courtesy of, Quick Pickles by Chris Schlesinger.

This recipe was introduced to me by one of my co-workers when I was working @ PepsiCo. At the time, he was into cooking even more than I was. He makes batches of pickles and distributes them to everyone in his team. Just as soon as he hands them out, people are already asking for more. It’s always nice to learn more about the people you work with everyday, it adds a whole new depth to them and I have a new found respect for someone I am just getting to know. I would have never thought that I would be making my own pickles, it was a realm that I never thought of exploring. Now that I have started, I can’t stop. I am having the best time learning about what spices to use, what herbs to experiment with and how something can be so tasty from just a few ingredients.

I am introducing you to the first pickle that I tried from the book, the Fresh Dill Cucumber Pickle, its been one of my favorites so far. I will make sure to share as I go through and try some others out.

Ingredients:

  • 5-6 pounds of pickling cucumbers (less than 5″ long)

  • 1 whole head of garlic, cloves peeled and minced

  • Bunch of Fresh Dill

  • 1/4 Cup pickling spices (see note below)

  • 3 cups red wine vinegar

  • 6 cups water

  • 1/2 cup kosher or other coarse salt

  • 3 small chilies (optional), slit in half

  • 2/3 cup peeled, finely grated horseradish (optional)

  • Grape Leaves (optional)

Pickling Spices*:

  • 1 TBLS coriander seed

  • 1 TBLS mustard seed

  • 2 tsp celery seed

  • 2 tsp whole black peppercorns

  • 2 whole cloves

  • 4 crumbled bay leaves

*For the pickling spices, I would place these all in a dry saute pan over medium heat and toast. Moving frequently, just a few minutes until you start to smell them. Remove from heat, to avoid burning them.

Time to tickle your…

First trim and discard the ends of the cucumbers. This is to speed up the absorption of the brine into the cucumbers. You can keep them whole, halve them, quarter them, or slice them into 1/4″rounds. I have made them every way and I prefer to quarter some and to slice them into 1/4″ rounds (I use a simple mandolin that literally cost me $11.00 at a hardware store).

Next, you’re going to pack all the ingredients into the jar, crock, or bowl. I start with some dill, garlic and a grape leaf on the bottom. Then I start adding the cucumbers, savings the smaller ones for the top. I divide the pickling spice among how many jars I have and I begin to sprinkle it in as I am filling it with the cucumbers.


In a nonreactive pot, bring the vinegar, water, and salt to a boil over high heat, stirring to dissolve the salt. Pour the hot mixture over the cucumbers, covering as much as you can. Allow to cool at room temperature, then cover, refrigerate, and in just a day or 2, the pickles will be ready to eat.

These pickles will keep, covered and refrigerated for at least 2 months.

Print Friendly and PDF

THE HARVEST ON FORT POND - MONTAUK NY

December 31, 2017 in Eat Out

This is a fitting first post as it has been a timeless staple for amazing food & atmosphere for anyone visiting Montauk, NY. For anyone who has ever been to the Harvest, their enormous family portions are hard to forget.

I would suggest making reservations a week in advance during the summer as the demand is insane. Good luck. 

Immediately as you sit down a large loaf of fresh thick sliced Italian bread is place in front of you, accompanied by grated Parmesan cheese and extra virgin olive oil for dipping. Make sure not to fill up on the bread as I have been doing for the last several years.

aacb1a_f1bf5fe32378435e81972857be0d6885~mv2.jpg


If you’ve never been here, then I would ask the server to recommend how many appetizers/pastas & entrees you should order based on the number of people. The servers are well rounded in food and wine and can explain where each of the ingredients comes from and how everything is prepared.

You can’t go wrong with the menu. We have been coming for years and there are certain favorites that must be ordered every time we come or else we do not feel complete. I will mention a few notables:


Appetizers/Salads- Calamari Salad with Red Pepper Vinaigrette (it’s worth coming just for this)

Pastas- Farfalle with Sausage, Peas and Parmesan & Garlic Shrimp and Spaghetti

Entrees- Bruschetta with Mixed Seafood (Mussels, Clams, Scallops and Shrimp) & 32 oz. Porterhouse Steak with Green Peppercorns, Onions and Shallots

The specials change daily and always seem to work their way into our decision making.

Next time you’re at “The End,” make sure you make reservations early and check out the Harvest on Fort Pond and make sure to take a walk out on the dock to feed the ducks, they’re hungry too…


Restaurant Info:

HARVEST ON FORT POND

11 S. Emery Street

Montauk, NY 11954

ph. 631.668.5574

http://www.harvest2000.com/hfp/

Print Friendly and PDF
aacb1a_dd72fc13366246809b9df1f759962f74~mv2.jpg

OYTSTERS KILPATRICK “THE AUSTRALIAN GEM”

December 26, 2017 in Snacks + Sides, Food for Thot

In 2005, I had the pleasure of studying abroad in Melbourne, Australia. It is by far the food Mecca of down under. People don’t drink Fosters beer, they don’t throw boomerangs and they don’t have pet kangaroos, although they do taste delicious. Cultures collide here to bring you some of the most unique blend of food across the world. There is everything from Little Italy to China Town, or if you prefer to just throw something on the “barbie.” Food rules this city and rightfully so.


Geographically, Melbourne is within a reels throw away from the water, which supplies some of the freshest seafood to the city. Until living there, I had developed a weird aversion to eating anything from the ocean. I had a somewhat traumatic experience that made me, a once seafood loving kid, avoid it like the plague. 


I had started off easy and ventured into the realm of  shrimp, it was like kindergarten for crustacean eaters. Before, I knew it I had graduated and was eating swordfish & dory (the blue fish from “Finding Nemo.” she was delicious). The only next step was to go completely out of my comfort zone: Oysters.

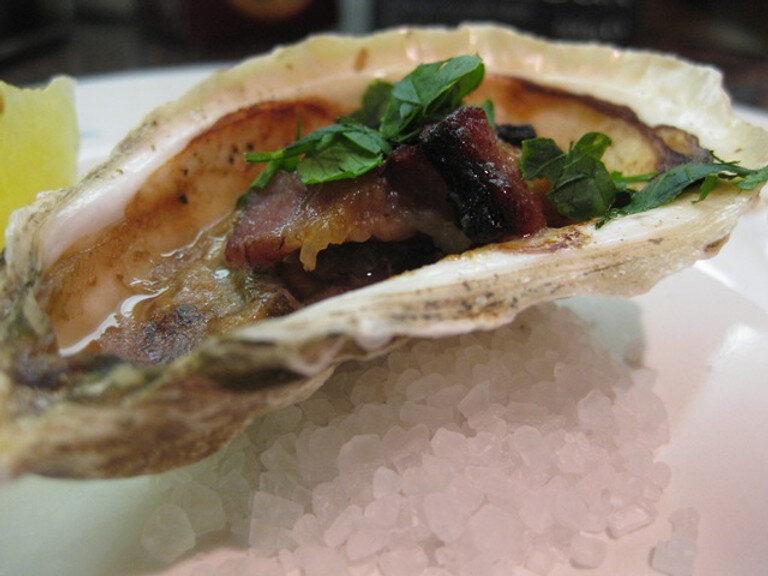
Never had I thought I would have a plate of “Oysters Kilpatrick” in front of me and actually be willing to try them. My family (some, who happens to live in Australia) assured me that they were not fishy and easy to eat. Not only were they right, I couldn’t stop eating them. I began ordering them out wherever I went and now here I am back in New York, and I am making them myself.


Ingredients

  • 1 Dozen Fresh Oysters

  • Few slices of thick cut bacon

  • Worcestershire sauce

  • Butter

  • Lemon

  • Flat-Leaf Parsley (optional)

  • Salt & Pepper

  • Rock Salt

aacb1a_37df7c9d9ce7406aa48871054b64f939~mv2.jpg


Instructions

Preheat oven to 400 degrees. Clean oysters properly and then carefully shuck them. The best way I know of shucking, is to place the oyster in a towel and carefully insert your shucking tool into the narrow end of the oyster, then wiggle back and forth until able to pry open.

The towel acts as a stabilizer and it also protects your hands from the tool. Discard the top shell and separate meat from lower shell, return to shell.

Place oysters on baking tray, lined with foil, which also has a layer of rock salt (rock salt will hold the oysters steady and stop them tipping and spilling their juices).

Next, I take small tabs of butter and place them on top of each oyster. Followed by a couple shots of Worcestershire sauce on top. Then a few cranks of fresh ground pepper and a light sprinkle of salt (optional). Then a few pieces of dices bacon on top of each, as little or much as you want.

Place in the preheated oven for 5-10 mins, until the bacon crisps up. Remove from oven and serve right off the tray, the rock salt stabilizes them better than any serving platter will. I then garnish with some fresh flat-leaf parsley and serve with lemon wedges.


Enjoy. Make sure you slurp up the juice that’s left over or dunk some bread into it. This was my way of bringing a little of Australia home with me.

Print Friendly and PDF
Prev / Next

Food for Thot

Just a boy who likes boys, cooking his little heart out. Using what my mamma gave me and drawing inspiration from growing up Italian + living all over the world.


Featured Posts

Featured
Nov 19, 2022
MOM'S FAMOUS CHEESECAKE
Nov 19, 2022
Nov 19, 2022
Nov 18, 2022
GRILLED CHEESE
Nov 18, 2022
Nov 18, 2022
Sep 7, 2022
THE TOMATO SAUCE
Sep 7, 2022
Sep 7, 2022
Jun 28, 2022
BUTTERMILK LEMON BLUEBERRY BRUNCH BREAD
Jun 28, 2022
Jun 28, 2022
Feb 27, 2022
LAVENDER SHORTBREAD COOKIES
Feb 27, 2022
Feb 27, 2022
Feb 26, 2022
El Turix (Taquería El Turix) - Mexico City
Feb 26, 2022
Feb 26, 2022
Jan 18, 2022
"GAYNOLA" - aka OLIVE OIL, MAPLE, CARDAMOM GRANOLA
Jan 18, 2022
Jan 18, 2022
Dec 13, 2021
TOMATO CONFIT
Dec 13, 2021
Dec 13, 2021
Nov 30, 2021
FLUFFY BUTTERMILK DINER STYLE PANCAKES
Nov 30, 2021
Nov 30, 2021
Nov 29, 2021
GREEK LEMON POTATOES
Nov 29, 2021
Nov 29, 2021